Photobucket
Photobucket
Photobucket
Photobucket

Showing posts with label diy. Show all posts

7/11/11

DIY: a homemade place mat with utensil holder

laura and i met in college. we were a part of the same greek Bible study. now, we both live in the same city and go to church together. to say i love laura's creativity is quite the understatement. 

you can often find her blogging here.  

happy crafting. and here's laura!
hello everyone! thanks to rachel for allowing me to share this project with you all. i came up with a homemade placemat with a pocket to hold a rolled napkin and/or a set of silverware. it's fairly simple and something i thought would be fun for summer. 

i originally thought of this project to be used for outdoor dining, to keep your napkin and silverware safely tucked away from the occasional wind gust, but then decided it could be used indoors to keep things neat and tidy on the table! any which way you decide to use these placemats is fine, 

so let's get to the how-to!

materials needed:

-1/2 yard of fabric. i used two different fabrics to have the contrasting pocket, but go wild and choose whatever your heart desires!
-matching thread
-timtex or any type of interfacing*
-scissors
-sewing machine (though this project could be done with liquid stitches if you don't want to get near a sewing machine)

* timtex is a type of interfacing, which is a soft, but flexible material that holds a crisp shape. interfacing is used to make purses more sturdy and to help hats hold their shape. i used it here on the placemat, to make it a thicker final product and something that would have a bit of structure to it. 


1.) i used fabric from my scrap pile and started out by cutting the placemat fabric to the size that i wanted with a 1" overhang on each side. my finished placemat is 14" x 17" so i cut my fabric to 16" x 19". i used this measurement based upon a placemat i had as a reference point.


2.) after cutting out your placemat fabric, it's a good idea to iron it. then it's time to cut out the fabric for the pocket. i measured my silverware and made my pocket to fit what i use most often for dining. my finished size of the pocket was 4" x 6" so i cut a piece that was 5" x 6.5". i only used a 1/2" hem on the pocket on the three sides. for the top, i did the tiniest hem i could by still finishing the edge. i did that part before sewing the pocket onto the placemat.


3.)  once you have your fabric pieces cut out, it's time to cut the interface to the desired size of the finished placemat. mine is 14" x 17". then i took my fabric right side down on the table and placed my interfacing on top of it in the center. i then proceeded to pin the two long sides of the placemat, pulling it somewhat taught so the placemat would be smooth once i turned it over.


4.) once you get two opposite sides completed, you'll be ready to finish the remaining two sides. be sure to pull the fabric tight when pinning and i folded in my corners for a nice, finished looking edge.


5.) next you're ready to put on the pocket. i ironed the edges of my pocket before sewing it so it would lay flat while i sewed. and this allowed me to make sure my pocket was the right size for my silverware. (see the third photo above for reference). i got too excited to finish the project at this point, that i forgot to take photos of this next step, but all you have to do is place your folded pocket onto the front of your placemat and put in exactly where you want it. once you figure out where to place the pocket, go ahead and pin the three sides, but not the top! that's where the silverware will slide in, so don't sew it shut!


6.) next you can see i sort of rolled my placemat up a bit, so it would fit under the foot of my sewing machine. i started on one side of my pocket and worked in a "U" shape so i didn't have to stop sewing. just sew three sides of the pocket onto the placemat and you're just about finished!


7.) the last thing to do is to trim all the hanging threads and then tuck your utensils into the placemat!


i hope you enjoyed the project. if you have any questions, please feel free to email me at lauraplinebarger@yahoo.com. and again, thanks rachel, for letting me share this little project!

6/30/11

DIY: Ginger Ale. Totally from Scratch.


what better summer treat than ginger ale from scratch? 

here's a quick how-to: 

p.s. i forgot to take pictures with a couple of the steps, but you'll get the gist.

still learning {and remembering} to document every single step with a DIY. 

cheers! 

Homemade Ginger Syrup for ginger ale
recipe from Joy the Baker. 
makes 2 cups ginger syrup

2 cups coarsely chopped ginger

2 cups granulated sugar
 
6 cups water


Grab your supplies. Chop up ginger. Place chopped ginger in a food processor (or blender in a pinch) and pulverize until well chopped.

Place ginger, sugar, and water in a large stock pot.  Bring to a boil, then reduce heat to a simmer and cook for 1 hour to 1 hour and a half, until the liquid has reduced down by more than half.  

You’re going from 6 cups of liquid to 2 cups.  The boiling syrup will become glossy and silky as it cooks down and nears completion. (forgot to take a picture of this part. dang it)

Remove syrup from the flame and strain twice through a cheese cloth, or fine mesh strainer, into a large bowl.  Let syrup cool slightly before pouring into a bottle to store.  Cool completely before incorporating into drinks.

Last step?? Get yourself some darling straws to drink your homemade ginger out of. 
Ginger Ale
1 cup club soda
3 tablespoons ginger syrup (or to taste)
lime wedge
dash of bitters (optional)
ice

Combine all ingredients in a glass over ice.  Stir with spoon to incorporate.  Enjoy immediately.  If you wanted to add bourbon… that would be delicious.


      Enjoy!


6/9/11

DIY: Make Your Own Coconut Frappuccino.

hi friends. 

my lovely friend katy is guest posting today. 
and it's going to be delicious.

katy and i met through the blogging world a few months back and i love her and her sweet little family. we sometimesbjoke about being friends in "real life" someday. 

joking aside, i do hope i can meet katy in person sometime. and i hope she has a coconut frappuccino in hand ;)

if you're new to my blog, welcome, i'd love for you to become a follower (left hand side bar) 

and i'd love to offer you a special discount code to my etsy shop. enter code "loveship" at checkout to receive free shipping on any item, this week only!

without further adieu her is katy...

hey guys! i'm katy from scottyboy and katygirl. rachel asked me to do a little DIY and so i thought long and hard about what i should do. then i posted on my blog last week about how much i'm in love with Starbucks' new mocha coconut frappuccino. someone left a comment with a link to a recipe and i thought i would give it a whirl. since the recipe is for your basic frappy frap, i put my own twist on things and i think it turned out quite excellent if i do say so myself.

ingredients:
(in no particular order)

IMG_3746

1. chocolate syrup
2. 1/2 extremely strong coffee
3. 1/2 packet of chocolate pudding
4. toasted coconut
5. whipped cream
6. coconut syrup
7. 1/2 (ish) of milk

now a few things to note on the ingredients:
1. these are not in order
2. i thought i made my coffee strong but it could have been a LOT stronger. so take a chance, people.
3. coconut syrup can be found in most grocery stores.
4. to make toasted coconut, i just put a layer on a cookie sheet and baked it for 10 minutes at 325 degrees.

directions:
1. fill a cup with ice. add pudding packet into cup.
(the recipe calls for one cupful of ice but i made mine with 2 and loved the consistency)

Picnik collage

2. add the 1/2 cup of coffee and 1/2 cup of milk.
you can add more milk if you want it easy on the coffee flavor.
add 1 TBSP of coconut flavor and a pinch or two of toasted coconut.

IMG_3750

3. blend all of your ingredients together.
pour into stolen starbucks cup.
add your desired amount of whipped cream, chocolate sauce, and toasted coconut.

IMG_3760

and you've got yourself a DIY frappy frap.
doesn't it look like you bought it?

some things i learned through this process:
1. blenders scare babies and make them cry.
2. no matter what your friends/family/conscience tell you, this recipe is 100% lo-cal.
(if i did it again, i would make it with sugar free pudding, non-fat milk, and ditch the whip/chocolate sauce.)
3. i really, really, really like toasted coconut.

thanks for playing along with me, friends! if you get a chance to try this yourself, let me know!

5/5/11

guest post- Mrs. Nato and the book mark

sounds like a fiction novel doesn't it??

if you don't know Mrs. Nato you should. she's hillarious, creative and drop dead sexy. ok, weird. but really she's beautiful. check out her blog here and show her some love. the Nato's have been a great support in our whole adoption process. in fact, Mrs. Nato was the original that encouraged me to blog and here i am...trying to walk in the footsteps of the great...like Nato. so, i know your waiting anxiously...here's the DIY guide by Mrs. Nato. 

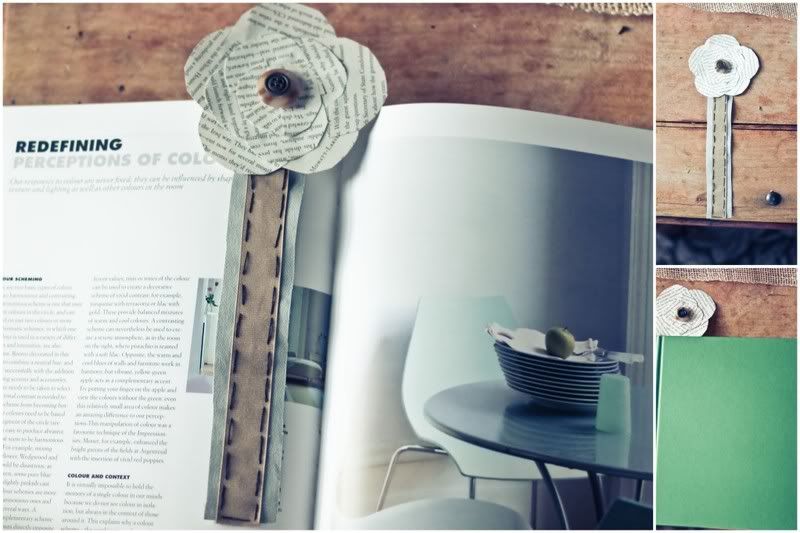
book paper book mark

for all you slackers out there, this could be a last minute mother's day gift...

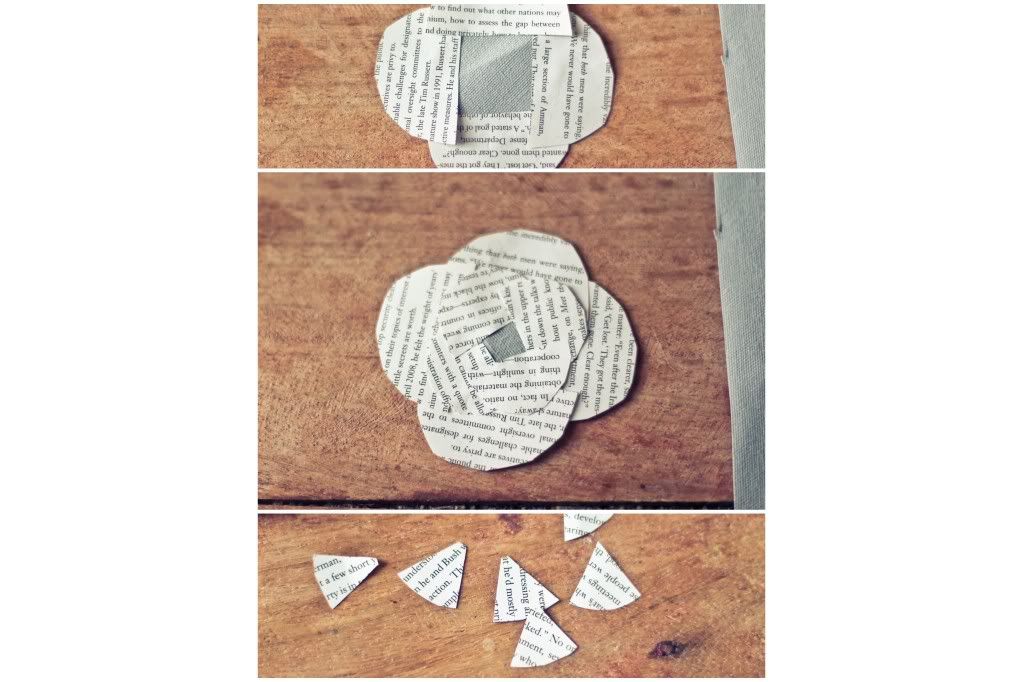
ok, so we'll make a flower with book paper. i've made this flower before...a million times. once here and once on a pillow. so you can go there for a more in depth tutorial.
i forgot to take a pick of my hot glue gun too. but you'll need that as well. so numero uno: gather materials.
Photobucket
my fabric backing is a really stiff fabric...you might opt for cardstock/cereal box cardboard if you don't have some sturdy fabric.

so you'll put your flower together using your half circles you cut out. start with 4 big half circles, then layer in the rest. there's no perfect way to do this...just experiment. you'll be fine.
Photobucket

i put a couple of buttons in the middle of mine
Photobucket

then glued the flower onto the "stem".
Photobucket

now, the bookmark would be cute like this. but then i put a piece of ribbon in the middle and sewed the edges.
Photobucket

then booya, you're awesome.

4/20/11

diy: making your drawers cute.

i'm really excited about today's do it yourself project.

i'm gonna teach you how to line your ugly drawers :)

do you have a desk? vanity? even kitchen drawers that are bare and need some love?

i bought this vanity (that i turned into a desk) at good juju last month and am in the process of tweaking it a bit 

           see the ugly inside?

       1. find what you want to line your drawers with. i chose an old map I had of Kansas City.

      2. next cut away!


      as you line the drawers you can do two things: 

         either cut the paper exactly to the dimension of the inside (which is hard!) 

   OR

       cut approximate measurements and then make creases on every edge

            then, fold the edges back and place that upside down in the drawer.


                          instant perfection! kind of...as you see i started with the first way of 
         cutting the paper, then decided folding was easier and better because i can't 
cut a straight line well! 

              yeah, Kansas City!
 

                then, push your drawers back in the desk and admire your work 
         ...and grab a mug of coffee

4/18/11

diy: GARDEN STYLE.

we decided to finally plant a garden this year. 

it can be a big process. 

here are some BASICS we learned in the process.

i hope it's helpful.

1. be sure to till the ground before laying down anything. we rented our tiller for $85 for a couple hours. well worth the cost.

2. Once the ground is loose, add your soil. Apparently there are TONS of different kinds, but find one that suits your needs.We chose an all natural kind.

3. Find out what cold weather veggies/fruits you want and begin to plant in March/April. Our local hardware store had a great list of when to plant what. 


4. Find an attractive man to plant your lettuce ;)


5. Pull up any weeds. They will ATTACK your garden later if you don't.


6. Dont' pull up the actual plant. You will need to re-plant it if you do. :)


7. And... be sure to plant broccoli. because it's good for you ;)

ta da. a garden! 
well, it's kinda more work than that, but you get the basics.

have any other tips for us new gardeners ?
Related Posts Plugin for WordPress, Blogger...